The cupcake recipe I chose was Vanilla Cupcakes with Mocha Icing from Karina's Kitchen and they were lovely. Of course they were gluten and dairy free though I did use happy eggs in them instead of egg substitute. You could easily use the substitute if you'd like these to be vegan and they would still taste amazing. For the extract I just used plain vanilla and for the vinegar I actually used raw apple cider vinegar. Not exactly "light tasting" but it seemed to work.
(I'm actually working on getting over some of my food allergies, though I'll save that story for another post. For now, cupcakes.)
For a personal touch I chopped some dark chocolate and sprinkled that over the icing since you can really never have too much dark chocolate. It was actually my first time using a pastry bag for frosting a cupcake and it was way too fun. Next time I just need to put the iced cakes in the fridge before the frosting starts to lose it's shape. Or I need to make the icing more stiff.
Without further delay...
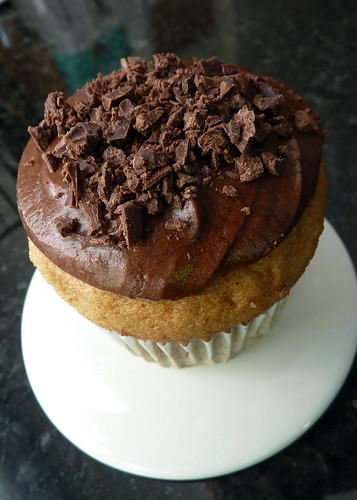 (photo courtesy of Lara, food blogger and photographer extraordinaire)
Vanilla Cupcakes with Mocha Icing
Preheat the oven to 350 degrees F. Line a 12-cupcake tin with paper or parchment liners
In a mixing bowl, whisk the dry ingredients together:
1 cup sorghum flour
1 cup tapioca starch
1 cup organic cane sugar
1/2 teaspoon sea salt
1 teaspoon baking powder
1 teaspoon baking soda
1 teaspoon xanthan gum
Add in:
1 cup warm vanilla rice milk or water
2 large happy eggs (or 1 tablespoon Ener-G Egg Replacer whisked with 1/4 cup warm water if you want these to be vegan)
3 tablespoons light olive oil
1 tablespoon bourbon vanilla extract
1/4 teaspoon light tasting vinegar
Beat with a mixer until the cake batter is smooth- roughly 2-3 minutes.
A reminder on gluten-free vegan batters: Gluten-free vegan batters behave a little different. They are often stiffer at first, then get sticky and stretch as the xanthan gum and egg replacer do their vegan g-free thing.
If the batter climbs the beaters, slow down the speed and slightly lift the beaters to encourage the batter to migrate back down into the bowl. Move your beater around the bowl in figure eights, at a slight angle.
Using an ice cream scoop or 1/4 cp measuring cup, plop the batter into the twelve liners. Smooth out the tops with wet fingers.
Bake in the center of a preheated oven until firm and dome shaped. For me this took about 19 minutes, though it could take up to 22 minutes, depending upon your particular oven and altitude.
Cool the pan on a wire rack briefly, then gently pop out the cupcakes and continue cooling on a rack (this avoids steaming the bottoms).
Make your icing.
Dairy-Free Mocha Icing Recipe
When making frosting, start with a small amount of liquid and add a little bit at a time until you achieve the consistency you want. If the icing gets too runny, add more confectioner's sugar to thicken it. You can also put the icing in the fridge for an hour to stiffen it.
2 cups confectioner's (powdered) sugar
2 tablespoons cocoa powder
2-3 tablespoons Spectrum Organic Shortening
2 ounces cold coffee, more as needed (or use rice milk if you don't like coffee but I thought the coffee added a nice flavor)
1 teaspoon bourbon vanilla
Starting with the least amount of liquid, beat the sugar and cocoa powder to incorporate the shortening, coffee and vanilla. If you need more liquid, add a small amount at a time. Beat for two minutes or so until smooth. If you need to stiffen the frosting, add a little more confectioner's sugar.
Chill the frosting before using it. I chill it, covered, for roughly an hour.
Frost the cupcakes. Cover in an air-tight container until serving. Best eaten the first day though I served them on day 2. If making ahead of time, chill frosted cakes briefly in the freezer before wrapping individually and freezing.
Makes twelve cupcakes. And if you're lucky like me, you'll still have a couple leftover after your birthday party that you can nibble on over the next week.
Enjoy!


 Posts
Posts